How to fill the backpack with 20 lb
Someone asked how to fill the backpack with 20 lb.
First - pack your bag with usual stuff you take to any hike. Water, food, jackets, first aid, ten essentials and any other gear or equipment. Think about things that you will need to take to a climb, and weigh the bag. I assume it must be between 10 - 15 lb. You do not have all the gear for now. So, you may not have 20 or 25 lb today. See how much you need to add to reach 20 or 25 lb. A liter of water will be 2.5 lb approx (including weight of bottle). So, you can add one or two bottles of water. If you have a water bladder, fill it - if it is 2 liter or more, it will add enough weight.
If you add a milk gallon full of water, it will be difficult to make the weight symmetric, it may hurt your shoulder, except - if you add two of them, that may be needed if you need to have 40lb or more.
Always - start with filling the bag with actual gear, and add more gear to increase weight - things like micro spikes, additional gloves, and jackets etc. That is easy. Adding extra gear will help distribute the weight symmetrically. if you still cannot reach the required weight for the particular hike, then add water in bottles or cans.
Meeting 2026 climbers
This is Muralee. I will be joining some of the training hikes.
I was happy to meet all the 2026 climbers at Wednesday's session.
The weekend hikes, informative zoom sessions, strength trainings - you will be learning a lot during the next few months. You will become physically and mentally strong. Once you gain more confidence, you will discover new capabilities within yourself. It is a fun learning path, enjoy the journey.
I always admired people who climbed mountains. I couldn't imagine climbing a mountain a few years ago. When I joined Team ASHA, the leads trained me and I ended up climbing mountains! They made me a fearless climber. I now love hiking and climbing, and happy to share that joy with you all. Follow all the instructions you receive from the leads, and make sure you enjoy every hike.
Training hikes give you opportunity to walk with your leads in person. We have several dozen leads with great experience and skills. Talk to them and learn from their experience. Walk with a different lead during every hike, so you get to talk to more leads. You also have the opportunity to meet many climbers who share the same passion.
All the best for the climbs you have signed up for. You will finish that and do more. Looking forward to hike with you all.
My favorite Christmas lights in and around Seattle
- Menashe House, West Seattle
Menashe house in West Seattle, couple of miles from Alki Beach. One of the best light displays in the Pacific Northwest . It is the Menashe Jewelers doing this, several years now. Waterfront home, you can drive up there, park car on the side and get out and see and photograph. They are happy to receive visitors.
 The Christmas lights display at Menashe House.

- Evergreen church in Bothell,WA
Free Show Nightly - Dec. 1st - 24th 6:00 pm - 9:00 pm
Free parking, free cookies. Coffee available to buy.
https://www.christmasatevergreen.com
 Christmas Lights at Evergreen Church, Bothell.
3429 240th Street Southeast, Bothell, WA, 98021
3. Keener's Light in Bothell, WA
Keener’s Christmas is a drive through private light display with over 100k lights with decorations from blow molds, blow ups and so much more! Hours are from 6-10 pm everyday weather permitting starting December 1st and ending December 31st.

16504 112th Pl NE, Bothell, WA 98011
- Kornfed's Christmas Lights in Bothell, WA
https://www.facebook.com/Kornfedschristmaslights
https://www.gofundme.com/f/kornfeds-christmas-lights-to-help-needy-families

10629 Sunrise Dr, Bothell, WA 98011
- The Lights of Christmas at Stanwood, WA
https://www.thelightsofchristmas.com
A drive-thru Christmas wonderland!
November 24-26, 30, December 1-3, 7-10, 14-17, 20-23, 26-30, 2023
Advanced reservations required.
 The Lights of Christmass at Stanwood, a drive-thru Christmas wonderland!.
20800 MARINE DRIVE, STANWOOD, WA 98292
6. Garden d’Lights 2023
https://bellevuebotanical.org/garden-dlights
Saturday, November 25 – Sunday, December 31, 2023 (closed Christmas Day)
Tickets must be purchased online.
Premium parking in the Garden’s lot is available for a fee.
 Garden d’Lights 2023, Bellevue Botanical Garden
Bellevue Botanical Garden
12001 Main Street, Bellevue, WA
7. Six million holiday lights at Marysville,WA
6 million holiday lights at Marysville, WA. This display is open form Nov 22, 2023 – Jan 15, 2024.
Free to drive around and see the lights.
“Tulalip Lights” is located along Interstate 5 and accessible at westbound exits 200 or 202

10400 34th Ave NE, Marysville, WA 98271
-end-
Quick sky replacement using photoshop
I am not a fan of altering images in post processing by adding or removing objects in the image. Adobe Photoshop recently added a Sky replacement feature. This feature is quite interesting to learn. I was taking some couple photos outside and it is raining all day this week, so the sky is grey all the time. Sky replacement helps to add some colorful skies into the images quite easily in some simple clicks. I have heard about some expensive plugins that uses the socalled Artificial Intelligence to do sky replacement in single click. Photoshop does this pretty fast compared to third party plugin. It was fun to learn sky replacement in Photoshop. You could add your own sky to replace or pick one from the free images provided by Photoshop.
This is a sample image after post processing using sky replacement.

This is the original image. The entire processing took under five minutes to finish.

The steps to replace sky:
Select the ‘Sky Replacement…’ from the Edit menu in Photoshop.

You can pick one sky from the available options, or you can upload your own.

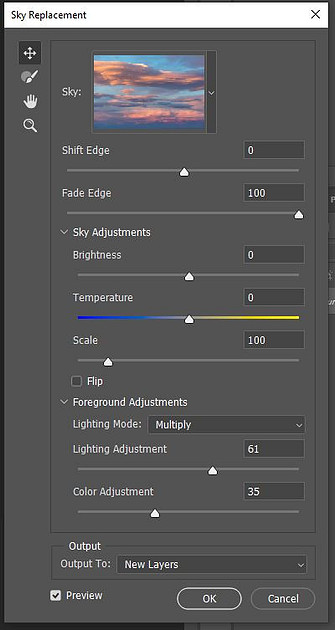
You can make several adjustment after selecting the sky. Shift edge, adjust temperature and brightness, Change scale, color adjustment, move the sky position etc. are some of them. The dialog that provides all these options is easy to learn, it is all sliders and pop down menu selections.
What can we do if there is water in the foreground ? If there is water and if the sky is colorful, then naturally there will be a reflection in the water if the water is calm. Photoshop do not have the capability to create a reflection, so we have to make our own. I created my own reflection.
Here are the steps for making a reflection of the sky in the water.
- Rasterize the layers using Ctrl-Alt-Shift-E in Windows and Command-Alt-Shift-E in Mac
- Make a duplicate layer
- Flip the duplicate layer vertically ( Edit -> Transform -> Flip vertical)
- Change the opacity of the layer to 50% so that you can also see the layer underneath it.
- Add a layer mark
- Hide the mask using Ctrl-I
- Use a white brush and reveal the contents in the foreground water.
- Reduce the opacity of the brush from 100-50% gradually when you move from center of the water to the edge of the water, so the change looks natural.
- After you finish working with the brush, change the opacity of the duplicate layer to 100%.
Voila, you are done with the adjustments.
You can now continue with your usual post processing of a landscape image by changing Saturation, Sharpness, Noise etc. to your taste.
-end-
How to make time lapse video
Introduction :
I always enjoy watching the time lapse of clouds and Sun moving in videos showed on TV during the weather news. My initial thinking was that it is probably a normal video fast forwarded 100 times to show several hours of dynamically changing scenery in just a few seconds. It became even more interesting to me once I learned how to do it with still images crated by a camera. I thought of scribbling what I learned in the past two years while making time lapse of beautiful scenes. I have created time lapse videos showing fast moving clouds, dancing Aurora ( also known as Northern Lights ) and Milkyway.
Planning :
We need to have a scene where there is moving objects in the frame. An intersection with busy traffic is a good example. Moving clouds make good subject too for time lapse. A busy railway station with trains and people, fireworks, Milkyway, starry sky etc. are all good examples for making time lapse. Make sure to have more than 50% of the area dynamically changing in the frame. If only a small portion of the frame is changing, then that may not make a good time lapse.
Equipment :
You can shoot a sequence of images to make time lapse video using any camera. You can even shoot the images with a phone, you will need an app to do this though - the conventional camera apps that come with the camera may not support this feature. What you need to do is to shoot a sequence of images at frequent intervals. You need a tripod to setup the camera. If there is any stable surface like a wall or car hood, then that is good enough too. Make sure the camera does not move while the images are photographed. Setup the tripod and camera in such a way that no objects ( like people or car ) move immediately in front of the camera and block shooting in the middle. If you are on a trail or a road, make sure to setup the camera a few feet away from the path so that it is not touched or obstructed by people. You will need a intervalometer to setup the camera to shoot images at frequent interval. Many digital cameras come with built in intervalometer. If your camera does not support this feature, you will need a cable release or wireless remote that support the intervalometer. Make sure the battery has enough charge left and also the memory card has enough space to store a few hundred images.
Shooting :
Setup the camera exposure in manual mode. Aperture priority is another way of setting it up if the light changes dynamically in the scene. Take test shots and make sure you get what you expect in the image, setup the exposure in manual or aperture priority mode. It is good to set the lens in manual focus mode. If there is large moving objects in the frame, the camera may struggle in auto focus mode, and you may lose some frames. The easy thing to do is to take a test shot in auto focus mode, and then change the lens/camera to manual focus mode. Or, you can lock the focus in many cameras. In either case, don’t let the lens do auto focus during the shoot. If you are shooting in a busy intersection, an interval of 1 to 5 seconds will give a good video at the end. If you are shooting clouds, 5 - 10 seconds interval is good, consider the speed of the wind. If the wind is heavy, chose short interval like 2-5 seconds. The interval between shots must be larger than your shutter speed. This is relevant if you are shooting in the night. For example, if the shutter speed is 5 seconds, the interval should be 5 seconds or larger. You can lower the ISO and use a wide aperture to get faster shutter speeds in the night. We will need 30 frames per second to make the video, means every 30 images will make one second long video. If you are shooting at 2 seconds interval, then you will get 30 images per minute. If you shoot for 30 minutes, then you will get 30 x 30 = 900 images in 30 minutes, which means the time lapse will have 900/30 = 30 seconds of video. If you are planning to setup the camera in your balcony and plan to shot the whole afternoon or evening to show the change in weather, then use larger intervals like 1 minute.
Post processing :
We will use Lightroom for processing the mages and Photoshop to create the video. Import all the images into Lightroom and do basic editing for the first image. I don't spend much time processing the images. Add some Vibrance and Saturation, adjust whites & blacks, lower the highlights and brighten up the shadows, and add some contrast, apply some dehaze +/-. This should give a reasonably good effect in the video. After editing the first image to your taste, sync all the images with this change. Select all images and export to JPG format. A resolution of 1920 on the longer side is good enough for 1080p video. Make sure to select 'Custom Name - Sequence' in the Lightroom export dialog.

We will now use Photoshop to create the video. In Photoshop, go to File menu and select Open. When the open dialog comes up, browse to the folder where the exported JPG files reside, then select the very first image. Check the 'Image Sequence' option at the bottom right corner of the open dialog. Click 'Open'.

Photoshop will now show another dialog box asking frame rate. Chose 30 as the frame rate. You can also choose 24 for slower video, it is up to you. I chose the standard 30 frames per second usually.

Click OK and Photoshop now will open the files and show a video group for editing, this will take only a couple of seconds. The layers panel will show a video group that you can now edit.

Go to Window menu in Photoshop and select 'Timeline', this will open the video time line at the bottom of the edit window.

Select the 'Audio track' option at the bottom of the Timeline to add an audio file so that you can add music to the video.

Voila, you are done with a basic editing of your time lapse video. Export and enjoy. Go to file menu, and select Export and then "Render Video. . . ' to export the video.

Use your video editing skills to make the video more pretty by adding effects.
Here is some Time lapse videos.
Milkyway and Mount rainier Milkyway and Mount rainier
Milkyway at Palouse falls state parkMilkyway at Palouse falls state park
Dancing of Aurora Borealis, aka Northern LightsThis time lapse video was shot at Gold Creek Pond, near Snoqualmie pass.
Clouds at gold creek pondThis was shot while waiting for Aurora to show up.